Pages

Search This Blog

Tuesday, January 31, 2012

SharePoint 2010 Controls

To provide many of the rich new features for SharePoint 2010, a number of new controls have been
added for use in master pages. The following table highlights most of the new controls:

CONTROLS DESCRIPTION
SharePoint:SPShortcutIcon Sets the favicon in the top left of the browser
URL bar
SharePoint:CssRegistration
After=”corev4.css”
Tells SharePoint what to load after Corev4 css
SharePoint:SPRibbon Adds the Fluent UI (the ribbon) to the page
SharePoint:PopoutMenu Adds the breadcrumb that, when clicked, shows
the pop-out that displays your current location in
the site in a hierarchical tree structure
SharePoint:SPRibbonPeripheralContent Adds various items that are attached to the ribbon
SharePoint:PageStateActionButton Loads the page edit and save icon button near
the top left of the page
SharePoint:LanguageSpecificContent Displays content specifi c to the selected language
Sharepoint:DeveloperDashboardLauncher Launches the developer dashboard (which is hidden
by default but can be enabled with STSADM
or PowerShell)
SharePoint:ClusteredDirectionalSepar
atorArrow
Loads the arrow near the site icon after the
page title
SharePoint:AspMenu Renders tableless navigation
SharePoint:VisualUpgradePreviewStatus Displays the Visual Upgrade status in the status bar
SharePoint:VersionedPlaceHolder
UIVersion=”3”
Enables the capability to target page elements to
v3 or v4 capabilities
SharePoint:ClusteredSPLinkButton This is how SharePoint 2010 makes use of CSS
sprites
SharePoint:DeveloperDashboard Loads the actual developer dashboard at the bottom
of the master page This is hidden until the
launcher is clicked
SharePoint:WarnOnUnsupportedBrowsers Displays a warning to users who are trying to
access the site with an unsupported browser (e g ,
Internet Explorer 6)
wssuc:MUISelector Sets the MUI language selected that shows up in
the welcome menu if language packs are installed
SPSWC:MySiteCssRegistration Allows the use of specific CSS

Color Coding for SharePoint Tasks Lists

In this post I will tell about how to give the color code to the tasks list which can be very attractive in knowing the status of the tasks.


  • Create a task list , in this example I have taken the default task list. 

  • Now create a column by the name "Color" and select the column type as "Calculated" and enter the following logic in the formula column and click Ok.
         =IF(OR(Status="Not Started",Status="Deferred"),"Yellow",IF(OR(Status="In  
        Progress",Status="Complete"),"Green",IF(Status="Waiting on Someone Else","Red")))


  • Now in the similar fashion create a new column by the name "Color Status", choosing column type as the "Calculated" and entering the logic in the formula section as given below.
          <DIV style='font-weight:bold; font-size:24px; color:Yellow;'>•</DIV>
  • Now your list will look like something like this:
  • Now create a text file and add the following code in that:
                <script type="text/javascript">
//
// Text to HTML
//
var theTDs = document.getElementsByTagName("TD");
var i=0;
var TDContent = " ";
while (i < theTDs.length) {
try {
TDContent = theTDs[i].innerText || theTDs[i].textContent;
if ((TDContent.indexOf("<DIV") == 0) && (TDContent.indexOf("</DIV>") >= 0)) {
theTDs[i].innerHTML = TDContent;
}
}
catch(err){}
i=i+1;
}
//
// ExpGroupRenderData overwrites the default SharePoint function
// This part is needed for collapsed groupings
//
function ExpGroupRenderData(htmlToRender, groupName, isLoaded) {
var tbody=document.getElementById("tbod"+groupName+"_");
var wrapDiv=document.createElement("DIV");
wrapDiv.innerHTML="<TABLE><TBODY id=\"tbod"+ groupName+"_\" isLoaded=\""+isLoaded+ "\">"+htmlToRender+"</TBODY></TABLE>";
var theTBODYTDs = wrapDiv.getElementsByTagName("TD"); var j=0; var TDContent = " ";
while (j < theTBODYTDs.length) {
try {
TDContent = theTBODYTDs[j].innerText || theTBODYTDs[j].textContent;
if ((TDContent.indexOf("<DIV") == 0) && (TDContent.indexOf("</DIV>") >= 0)) {
theTBODYTDs[j].innerHTML = TDContent;
}
}
catch(err){}
j=j+1;
}
tbody.parentNode.replaceChild(wrapDiv.firstChild.firstChild,tbody);
}
</script>
  • Upload the text file on the sharepoint site (say in the shared document library)
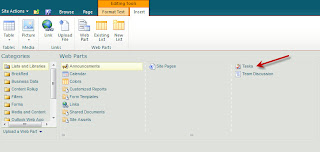
  • Now add the task list webpart on the page you want to display.
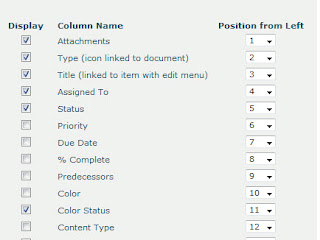
  • Edit the webpart and select the columns that are of use.
  • Now add the content editor webpart right below the task list webpart (otherwise it will not work).
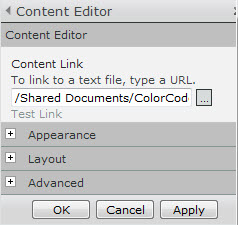
  • Edit the webpart and change the content link to the link where the text file was uploaded.(as i have uploaded in the shared document library)
  • Set the content editor webpart to be hidden and  chrome type to be none.
  • Now save the page and the list will look something like this.

Happy Coding..!!!

Set default value of custom WebPart properties

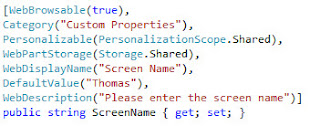
While setting the default value of the custom webpart properties i tried out using the attributes property such as


but they didn't worked so here is the method that works.


Wednesday, January 25, 2012

How to set Favicon to the SharePoint 2010 site

SharePoint 2010 comes with a orange Favicon and the image is present in following location
SharePoint Root Folder\Template\Images
[eg. C:\Program Files\Common Files\Microsoft Shared\Web Server Extensions\14\TEMPLATE\IMAGES\].

Open this folder and search for favicon.ico and rename the file to FaviconBackup.ico.
Now copy your favicon to this folder and make sure it's named as "favicon.ico".
Now restart IIS(open Command Prompt -> IISReset), clear browser cache/temproary internet files.
Close the browser and reopen then browse the SharePoint site.

If mulitple sites are hosted in same farm and need to set different favicons for different sites then we have to update Master Page Code.
Open the site with SharePoint Designer 2010 and select Master pages -> v4.master. The default.master is still present in SharePoint 2010 for backward compatibility and visual upgrade.
But SharePoint 2010 uses v4.master only. Now click "Edit File" link to add the favicon code. If it asks for check out, click yes and continue.

Find the following line in the master page:


<SharePoint:SPShortcutIcon runat="server" IconUrl="/_layouts/images/favicon.ico" />


and change the path of favicon.
e.g.:
<SharePoint:SPShortcutIcon runat="server" IconUrl="/_layouts/images/brickred/favicon.ico" />


Save and close (If you have checked out then you need to check in and site collection administrator has to approve it via Site Settings -> Galleries -> Master pages and page layouts -> Check in and Approve).

Now reset IIS/clear browser cache and check.


Tuesday, January 24, 2012

Setting the chunk size for downloading a file in Sharepoint 2010

Whenever you download a document from Sharepoint, Sharepoint puts the document in memory stream. There is a limit set as to how much data needs to be retrieved in a go if the document is heavy. This is controlled through chunk size.

Sharepoint default chunk size is set to 5MB, this means that if a client tries to open a document of 50MB and the chunk size is 5MB, the document is divided and retrieved in 10 chunks. Each chunk will be loaded into the memory of both the WFE handling the request and the SQL Server.

You can change the chunk size by executing following command using STSADM:

stsadm -o setproperty -pn large-file-chunk-size -pv 1073741824

This will set the chunk size to 1024 MB i.e. 1073741824 bytes.


Larger chunk size increases the performance, but adds more load on the WFE and SQL server as more data is loaded into the memory. So to set a desired chunk size, factors like number of users accesssing the site, system RAM, default file size that users are uploading to your system etc should be considered.

Monday, January 23, 2012

How to Create FTP site in IIS 7

You can follow below mentioned steps to create a Basic FTP site in IIS 7.

  • Create a folder named "ftproot" at <System Drive>\inetpub\" if it not already exists. You may use any name for this folder.


  • Set the permissions to allow anonymous access by typing the following command in the Command Prompt:
         ICACLS "%SystemDrive%\inetpub\ftproot" /Grant IUSR:R /T


  • Type "inetmgr "to open the IIS in command prompt.
  • Under Sites Section, right-click the node click Add FTP Site.


  • Enter name of the site and select the path of the physical folder that you created in step 1. Click Next


  • On the next section, Choose an IP address for your FTP site from the IP Address drop-down, or choose to accept the default selection of "All Unassigned."
  • Enter the TCP/IP port for the FTP site in the Port box. I will go with the default port of 21.
  • Make sure that the Certificates drop-down is set to "Not Selected" and that the Allow SSL option is selected. Click Next


  • On the next tab, select Anonymous for the Authentication settings.
  • I have selected the option - Allow Access to: All Users and given all the users Read and Write permissions. You can change these settings as per your requirements.


This completes your initial configuration.You can check the newely created FTP location by typing the following URL in Windows Explorer:
        ftp://%3cyour/ Domain>:port/
In order to add folders and files to the FTP location, you will need to enable Basic Authentication on this FTP site.
Now you are ready to access the FTP site in your domain.

Cannot connect to database master at SQL during Installation of Sharepoint 2010

Whenever you try to Install Sharepoint 2010 on your server after running the Pre-requisits installer, you might face the issue where you receive the error message as below:

"Cannot connect to database master at SQL server at SERVERNAME. The database might not exist, or the current user does not have permission to connect to it."

This issue usually comes when you try to add database instance name in the Sharepoint 2010 Installation WIzard (when the SQL server is deployed on the server other than the one in which you are installing Sharepoint).

You can follow below steps to resolve this issue.

1) Navigate to Microsoft SQL Server 2008 and open the "SQL Server Configuration Manager".

2) Under the "SQL Server Configuration Manager", select the section "Protocols for MSSQLSERVER" under SQL Server Network Configuration.

3) Ensure that the protocol named TCP/IP is enabled, if its not enable it.

4) Ensure that you restart SQL Server after doing this change from the "SQL Server Services".


Sunday, January 22, 2012

Powershell script to get all site templates in the sharepoint farm : SharePoint 2010

Sometimes , we want to know the template name of the site if we need to create the site from a template using code or powershell script.

The names of all the templates in a sharepoint farm can be obtained by executing the following powershell command let :
Get-SPWebTemplate | Sort-Object "Name"

However, if we want additional information for each web template like its id, we can use the following powershell script to iterate over all the web templates and add them to a new powershell 'PSObject':

function Get-SPWebTemplateWithId
{
    $templates = Get-SPWebTemplate | Sort-Object "Name"
    $templates | ForEach-Object {
        $templateValues = @{
            "Title" = $_.Title
            "Name" = $_.Name
            "ID" = $_.ID
            "Custom" = $_.Custom
            "LocaleId" = $_.LocaleId
        }
        New-Object PSObject -Property $templateValues | Select @("Name","Title","LocaleId","Custom","ID")
    }
}
Get-SPWebTemplateWithId | Format-Table

This powershell script will give the following output:


Saturday, January 21, 2012

Switch Application on Claim Authentication

If your application is currently configured with window authentication, and want to switch on claim, you can use below powershell commends for it.

$SPWebApp = Get-SPWebApplication "http://localhost"
$ SPWebApp.UseClaimsAuthentication = $True
$ SPWebApp.Update()
$webapp.ProvisionGlobally()
iisreset

ContentIterator - Iterate SPListeItem

If you have large set of content in the list and while accessing it using the CAML query, you might get the SPQueryThrottleException error or throttling limitation issue . To avoid such kind of situation, ContentIterator class can be used. This class implement a callback patter to divide the query, to process a single item at a time.


protected void TestIterator(object sender, EventArgs args)
 {   
  TotalItems = 0;     TotalExceptions = 0;     

  ContentIterator objContentIterator = new ContentIterator();
    SPQuery objSPQuery = new SPQuery();
     
   objSPQuery.Query = objString;
SPList objList = SPContext.Current.Web.Lists["Employees"];
  iterator.ProcessListItems(objList,objSPQuery,         ProcessItem,         ProcessError     ); }  

public    bool ProcessError(SPListItem item, Exception e)  {      // process the error      
TotalExceptions++; 
return true; }

public void ProcessItem(SPListItem item) {      
TotalItems++;
//process the item. }

Wednesday, January 18, 2012

SharePoint Inspector

SharePoint Inspector is a free tool to browse your SharePoint farm.

Displays SharePoint objects with reflection on their properties :
  • Farm
  • Servers
  • Services
  • Feature Definitions
  • Solutions
  • Databases
  • Web Applications
  • Site collections
  • Websites
  • Content Types
  • Site Columns
  • Features
  • Lists
  • Associated Workflows
  • Event Receivers
  • Recycle Bin
  • ...
Actions :
  • Activate / Deactivate feature
  • Add / remove event receiver on list and content type
  • Manage Recycle bin

You can see objects composing its structure, get their properties by reflection, which can be very useful when you want to check if your code does what it should do.
You can use also some advanced features like activate/deactivate SharePoint features, add/remove event receivers, manage your recycle bin.


Download Link
http://spi.codeplex.com/

Get Current Web Application - Alternate Access Mappings Programmatically | SharePoint

Some times we need to get all the Alternate Access Mapping of the current site.

Below code snipped will help you to achieve this:

Code:


class Program
    {
        private static List<Uri> GetSiteAlternateAccessMappingsUrls(SPSite site)
        {
            List<Uri> alternateUrls = null;
            // Make sure anonymous users can access the web application properties
            SPSecurity.RunWithElevatedPrivileges(delegate()
            {
                alternateUrls = new List<Uri>();
                // Retrieve the WebApplication object
                SPWebApplication webApplication = site.WebApplication;
                // Get Alternate Url
                foreach (SPAlternateUrl alternateUrl in webApplication.AlternateUrls)
                {
                    Uri url = new Uri(alternateUrl.IncomingUrl);
                    // Fill the List
                    alternateUrls.Add(url);
                }
            });
            // Return the list with the urls             
            return alternateUrls;
        }

        static void Main(string[] args)
        {
            try
            {
                using (SPSite site = new SPSite("http://br-pc-275:6000/"))
                {
                    List<Uri> test = GetSiteAlternateAccessMappingsUrls(site);
                }

            }//end of try
            catch (Exception ex)
            {
            }
        }
    }

Thanks,

Creating Document Sets by SharePoint API Code C#


Document sets are more than simple folders. They hold metadata, which is changing the way users are working and they are taking advantage of it.
Below code will show you how to create document sets programmatically, 
Add reference of Microsoft.Office.DocumentManagement.dll in your project and use below code, available at the directory \14\ISAPI\.

String LIBRARY_NAME = "Document Set Example";
            String DOCUMENT_SET = "Document Set";

            using (SPSite site = new SPSite("http://br-pc-203"))
            {
                using (SPWeb web = site.RootWeb)
                {
                    string docSetContentTypeName = "My Document Set";
                    SPContentType ctype = null;

                    if (web.ContentTypes[docSetContentTypeName] == null)
                    {
                        // Creating the document set (content type)
                        ctype = new SPContentType(web.ContentTypes[DOCUMENT_SET], web.ContentTypes, docSetContentTypeName);
                        ctype.FieldLinks.Add(new SPFieldLink(web.Fields[SPBuiltInFieldId.Birthday]));
                        ctype.Group = "Custom Content Type";
                        web.ContentTypes.Add(ctype);

                        // Getting the document set (content type)
                        DocumentSetTemplate documentContentType = DocumentSetTemplate.GetDocumentSetTemplate(ctype);

                        // Sharing fields
                        documentContentType.SharedFields.Add(web.Fields[SPBuiltInFieldId.Birthday]);

                        // Displaying fields
                        documentContentType.WelcomePageFields.Add(web.Fields[SPBuiltInFieldId.Birthday]);

                        // Updating the document set (content type),   
                        documentContentType.Update(true);
                        ctype.Update();
                    }

                    ctype = ctype ?? web.ContentTypes[docSetContentTypeName];

                    if (web.Lists.TryGetList(LIBRARY_NAME) == null)
                    {
                        // Creating document library
                        Guid libraryGuid = web.Lists.Add(LIBRARY_NAME, "", SPListTemplateType.DocumentLibrary);
                        SPDocumentLibrary list = (SPDocumentLibrary)web.Lists[libraryGuid];

                        // Setting properties
                        list.OnQuickLaunch = true;
                        list.ContentTypesEnabled = true;
                        list.EnableFolderCreation = false;

                        // Defining content types
                        list.ContentTypes.Delete(list.ContentTypes["Document"].Id);
                        list.ContentTypes.Add(ctype);
                        list.Update();

                        System.Collections.Hashtable properties = new System.Collections.Hashtable();
                        properties.Add("DocumentSetDescription", "My first Document Set by Code"); //InternalName
                        properties.Add("Birthday", DateTime.Now); //InternalName

                        // Creating the document set
                        DocumentSet.Create(list.RootFolder, "My First Document Set", list.ContentTypes.BestMatch(ctype.Id), properties, true);
                    }
                }
            }


Hope it helps !!!!!

Export SharePoint 2010 sites name to Excel file using Powershell


To get the SharePoint 2010 sites name in an Excel file using Powershell,

Go to SharePoint 2010 Management Shell, right click - Run as Administrator


And type the following command at the PowerShell prompt:
Get-SPSite | Get-SPWeb | Select url,title | Export-Csv


After that, this will ask for Path. Provide any physical drive name with file name (e.g.: C:\Sites.csv)

This will export all the sites name in excel file.

Thanks

Tuesday, January 17, 2012

SharePoint workflow staus codes

The enum SPWorkflowStatus in the namespace "Microsoft.SharePoint.Workflow" in the library "Microsoft.SharePoint" is what we have to use for these status codes.

0
NotStarted
Not Started
1
FailedOnStart
Failed On Start
2
InProgress
In Progress
3
ErrorOccurred
Error Occurred
4
StoppedByUser
Cancelled
5
Completed
Completed
6
FailedOnStartRetrying
Failed on Start (retrying)
7
ErrorOccurredRetrying
Error Occurred (retrying)
8
ViewQueryOverflow
--
9-14
Unknown
Unknown
15
Cancelled
Cancelled
16
Approved
Approved
17
Rejected
Rejected