Pages

Search This Blog

Showing posts with label webpart. Show all posts

Monday, February 6, 2012

SharePoint Twitter 3.0


What is SharePoint Twitter?


Are you looking to show the twitter updates of your organization on your sharepoint portal ? If yes, then this project is what you might need.
We are providing five !webparts for SharePoint 2007 & SharePoint 2010.
  1. First, that can be used to show the tweets of any user on the SharePoint portal.
  2. Second webpart can be used to post tweet to twitter directly from your sharepoint portal.
  3. Third webpart can be used to show the friends of any user on the SharePoint portal.
  4. Fourth webpart can be used to show the followers of any user on the SharePoint portal.
  5. Fifth webpart can be used to show the 'follow us' link, which lets the user follow with a single click.
Just download and install, and you are all set.
All you need is to configure the twitter settings for each of the WebParts after installation.
These web parts use out of the box SharePoint CSS elements that match automatically with your current site theme.

Features

  1. Posting / Reading tweets from / to your twitter page
  2. 'follow Us' button webpart included.
  3. Paging support
  4. Show user images
  5. Show Header and footer
  6. Support for rich media content like images, links etc 

Tuesday, January 31, 2012

Set default value of custom WebPart properties

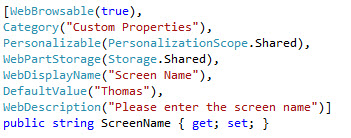
While setting the default value of the custom webpart properties i tried out using the attributes property such as


but they didn't worked so here is the method that works.


Tuesday, November 8, 2011

Add Custom Property Panel in Custom WebPart like OOB SharePoint Property Panel via Reflection


Sometime we have a requirement to create custom property in WebPart. But the custom Property will add in “Miscellaneous” section or added in blank section if we add property via custom tool part. Now if you want to create panel like OOB Panel “Layout, Appearance etc.” then use below method.
Below class is static class for enabling extension method on ToolPart class. You need to add below class in your solution and add namespace in your toolpart class where you want to use this method
namespace ExtensionMethods
{
    public static class CustomExtensions
    {
        public static Panel GetPropertyPanel(this ToolPart currentToolPart, Table table, StringsTitle)
        {
            Panel controlPanel = new Panel();
            controlPanel.ID = "propertyPanelHideDisplay";
            controlPanel.Attributes.Add("id", currentToolPart.ClientID + "_" + controlPanel.ID);
            controlPanel.Controls.Add(table);

            Literal lt = new Literal();
            String sScript = "<script language='javascript'>\n" +
                            " var objDiv = document.getElementById('" + currentToolPart.ClientID + "_" + controlPanel.ID + "');\n" +
                            " objDiv.parentNode.parentNode.parentNode.attributes.removeNamedItem('colspan');\n" +
                            " objDiv.parentNode.parentNode.parentNode.attributes.removeNamedItem('class'); \n" +
                            "</script>";
            lt.Text = sScript;
            controlPanel.Controls.Add(lt);

            Type type = typeof(SPSite);
            Assembly assembly = type.Assembly;

            var bindingFlags = BindingFlags.Instance | BindingFlags.Public |BindingFlags.NonPublic;

            Panel propertyPanel = (Panel)assembly.CreateInstance("Microsoft.SharePoint.WebPartPages.TPPanel"false, bindingFlags,null,
               new object[] { sTitle, controlPanel, true }, nullnull);

            return propertyPanel;
        }
  
 }
}

Below is the sample class for ToolPart for adding Panel by using above class

using ExtensionMethods;
namespace CustomNamespace
{
    class CustomToolpart : ToolPart
    {
        private DropDownList ddlDisplayType;
     
        protected override void CreateChildControls()
        {
            base.CreateChildControls();
            CreateControls();
        }

        public override void ApplyChanges()
        {
            EnsureChildControls();
            SendDataToWebPart();
        }

        private void SendDataToWebPart()
        {
            EnsureChildControls();
            CustomWebPart customWebPart = (CustomWebPart)this.ParentToolPane.SelectedWebPart;

            // Send the custom text to the Web Part.
            if (ddlDisplayType != null)
            {
                customWebPart.Property = ddlDisplayType.SelectedValue;
            }

           
        }

        public override void SyncChanges()
        {
            base.SyncChanges();
           
        }

        private void SetValues()
        {
            ListItem item = null;
            CustomWebPart customWebPart = (CustomWebPart)this.ParentToolPane.SelectedWebPart;
            if (!string.IsNullOrEmpty(customWebPart.Property))
            {
                item = ddlDisplayType.Items.FindByValue(customWebPart.Property);
                if (item != null)
                {
                    ddlDisplayType.SelectedValue = item.Value;
                }
            }
        
           
        }

        public override void CancelChanges()
        {
            base.CancelChanges();
        }


        protected override void RenderToolPart(System.Web.UI.HtmlTextWriter output)
        {
            base.RenderToolPart(output);
        }


        public void CreateControls()
        {
          
            ddlDisplayType = new DropDownList();

            ddlDisplayType.Items.Add("Property 1");
            ddlDisplayType.Items.Add("Property 2");
            ddlDisplayType.Items.Add("Property 3");

            AddControls();
            SetValues();
          
        }

        private void AddControls()
        {
            Table table = new Table();
            TableRow tr = new TableRow();
            TableCell td = new TableCell();
            Literal ltStatic = new Literal();

            ltStatic.Text = "Custom Property";
            td.Controls.Add(ltStatic);
            tr.Cells.Add(td);
            table.Rows.Add(tr);
           
            tr = new TableRow();
            td = new TableCell();
            td.Controls.Add(ddlDisplayType);
            tr.Cells.Add(td);
            table.Rows.Add(tr);

            String sTitle = "Panel Title";
            this.Controls.Add(this.GetPropertyPanel(table, sTitle));
        }
    }
}


In above class bold line will return Panel and add the Panel in ToolPart Pane. Below is the screen shot for the above implementation


Hope it help !!!!

Tuesday, June 14, 2011

Validate Browsable Property of a Web Part and show exception message in the Webpart’s Tool Pane

Many a times we are into a situation where we have to apply some validations on the custom browsable property of a webpart and if the value in the property is not valid than we need to show Exception message in the ToolPane of the webpart itself.
We can validate these properties and can show the exception message also. To do this we need to put the validation part in the “SET” part of Property definition itself as show below.
Suppose we have to create a property which will accept the XML strings only and we want to restrict the user to enter invalid XML string and show error message on the ToolPane of the webpart.
This requirement we can achieve by using Regular Expression. Below is the code snippet by which we can do this.
private string _QueryFilter;
        [Personalizable(PersonalizationScope.Shared)]
        [WebBrowsable(true)]
        [Category("Display")]
        [WebDisplayName("CheckProperty")]
        [Description("Description of the Webpart")]
        public string QueryFilter
        {
            get { return _QueryFilter; }
            set
            {
                string pattern = @"<where><[^>]+>[^<]*</[^>]+></where>";
                System.Text.RegularExpressions.Match match =
                Regex.Match(value.Trim(), pattern, RegexOptions.IgnoreCase);
               
if (!match.Success)                  
                        throw new WebPartPageUserException("The query filter is not a valid Caml query string");
               

                _QueryFilter = value;
            }
        }

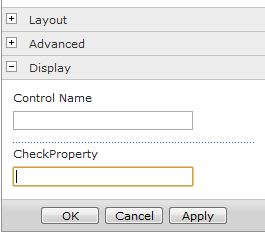
Now when we deploy this webpart property it will look like this


And after writing the XML string it will validate the string based upon our regular expression. If the expression is not valid than it will throw the WebPartPageUserException as shown below:


In this way we can validate the browsable property of the webpart.
Hope it will be a help to you!
Ravish

Monday, April 25, 2011

Problem with sharepoint inputformtextbox control with updatepanel

When using SharePoint:InputFormTextBox control in UpdatePanel I faced one issue. On my webpart part page I had one SharePoint:InputFormTextBox control with one asp:DropDown control with autopostback property true. On SelectedIndexChanged event of that dropdown, InputformTextBox control appears without toolbar. This behaviour was coming because the InputformTextBox is a TextArea control. It needs script to achieve the rich text box feature when loading the page and in update panel due to partial postback the script was not loading. To fix this issue we are required to load that script. I am giving you the steps to fix this issue:
Step 1: Put this script function in design code.
<script language="javascript" type="text/javascript">
function CreateRichEdit(elementid)
{
if (browseris.ie5up && browseris.win32 && !IsAccessibilityFeatureEnabled()){
g_aToolBarButtons = null;
g_fRTEFirstTimeGenerateCalled=true;
RTE_ConvertTextAreaToRichEdit(elementid, true, true, "", "1033", null, null, null, null, null,"FullHtml", "\u002f",null,null,null,null);
RTE_TextAreaWindow_OnLoad(elementid);
RTE_DocEditor_AdjustHeight(elementid);
RTE_DocEditor_AdjustWidth(elementid);
}
else{
document.write("&nbsp;<br><SPAN class=ms-formdescription><a href='javascript:HelpWindowKey(\"nsrichtext\")'>Click for help about adding basic HTML formatting.</a></SPAN>&nbsp;<br>");
};
}
</script>


Step 2: Put this code in code behind file

protected void Page_PreRender(object sender, EventArgs e)
{
ScriptManager.RegisterStartupScript(this.Page, this.Page.GetType(), "@@CreateRichEdit", "<script>CreateRichEdit('" + InputformTextbox.ClientID + "');</script>", false);
}

Thanks
Prabhat

Monday, February 28, 2011

Creating Link Column in SPGridView

In a scenario I have to create WebPart which shows a SPGridView in which there will be a Link column which is to be binded from a list column (Single Line Text type).I have googled much for it but could not find it. Under the guidance of Sourabh Khatri I have been able to come up with a solution which helps me to achieve my aim. I divided up it in three parts

1.WebPart
2.DAL
3.Entities


FILE#1: WebPart (TestWebPart.cs) (In this file I have designed the webpart, SPGridView and supporting class to make link column)

using System;
using System.Web.UI;
using System.Web.UI.WebControls;
using Microsoft.SharePoint;
using Microsoft.SharePoint.WebControls;

namespace WebPart
{
public class TestWebPart : System.Web.UI.WebControls.WebParts.WebPart
{
protected override void CreateChildControls()
{
BoundField objField;
SPGridView objGrid;
TemplateField objTemplateField;
Table objTable;
TableCell objTableCell;
TableRow objTableRow;

ListInfo objListInfo = ListHandler.GetAllListItems();
try
{
if (objListInfo!= null && objListInfo.DataList != null)
{
objTable = new Table();
objTableRow = new TableRow();
objTableCell = new TableCell();
objGrid = new SPGridView();

objGrid.DataSource = objListInfo.DataList;

#region Styling the Grid
objGrid.AutoGenerateColumns = false;
objTableCell.CssClass = "gridborder";
objGrid.RowStyle.CssClass = "gridrow";
objGrid.AlternatingRowStyle.CssClass = "grid_alternaterow";
objTable.Width = Unit.Percentage(100);

#endregion

#region Creating Grid Columns

objTemplateField = new TemplateField();
objTemplateField.HeaderTemplate = new
GridViewRowTemplate(DataControlRowType.Header, "ColumnHeaderName");
objTemplateField.HeaderStyle.CssClass = "header";
objTemplateField.ItemTemplate = new
GridViewRowTemplate(DataControlRowType.DataRow, "ColumnName");
objGrid.Columns.Add(objTemplateField);

// A NonLink Field
objField = new BoundField();
objField.DataField = "Description";
objField.HeaderText = "Description";
objField.HeaderStyle.CssClass = "header";
objGrid.Columns.Add(objField);

#endregion

objGrid.DataBind();

objTableCell.Controls.Add(objGrid);
objTableRow.Cells.Add(objTableCell);
objTable.Rows.Add(objTableRow);
this.Controls.Add(objTable);
}
}
catch (Exception e)
{
}
base.CreateChildControls();

}


public class GridViewRowTemplate : ITemplate
{
private DataControlRowType templateType;
private string columnName;

public GridViewRowTemplate(DataControlRowType templateType,string columnName)
{
this.columnName = columnName;
this.templateType = templateType;
}

public void InstantiateIn(System.Web.UI.Control container)
{
switch (templateType)
{
case DataControlRowType.Header:
Literal objLiteral = new Literal();
objLiteral.Text = "" + columnName + "";
container.Controls.Add(objLiteral);
break;
case DataControlRowType.DataRow:
LinkButton linkButton = new LinkButton();
linkButton.DataBinding += new EventHandler(linkButton_DataBinding);
container.Controls.Add(linkButton);
break;
}
}

void linkButton_DataBinding(object sender, EventArgs e)
{
string reportName = string.Empty;
string ListItemName = string.Empty;
LinkButton linkBtn = (LinkButton)sender;
SPGridViewRow row = (SPGridViewRow)linkBtn.NamingContainer;
ListItemName= Convert.ToString(DataBinder.Eval(row.DataItem, " ListItemName "));

linkBtn.Text = ListItemName;
linkBtn.Attributes.Add("onclick", "javascript:alert(‘”+ListItemName+ ”’);”);
}
}
}
}


FILE#2:DAL(ListHandler.cs) (In this file I have read the list content to be shown in the SPGridView)

using System;
using System.Data;
using System.Configuration;
using System.Linq;
using System.Web;
using System.Web.Security;
using System.Web.UI;
using System.Web.UI.HtmlControls;
using System.Web.UI.WebControls;
using System.Web.UI.WebControls.WebParts;
using System.Xml.Linq;
using Microsoft.SharePoint;
using Microsoft.SharePoint.WebControls;
using System.Text;

namespace WebPart
{
public class ListHandler
{
public static ListInfo GetAllListItems ()
{
SPWeb objWeb = null;
SPListItemCollection objItems;
ListItemsInfo objListItemInfo = null;
System.IO.FileInfo objInfo;

try
{
objWeb = SPControl.GetContextWeb(HttpContext.Current).Site.RootWeb;
if (objWeb != null)
{
objItems = objWeb.Lists.TryGetList(“ListName”).Items;
if (objItems.Count > 0)
{
objListItemInfo = new ListItemsInfo ();
foreach (SPListItem objItem in objItems)
{
objListItemInfo.ListItems.Add(new ListInfo (objItem.Name, Convert.ToString(objItem[“ColumnName”]), Convert.ToString(objItem.Title)));
}
}
}

return objListItemInfo ;
}
else
{
throw new Exception("Cannot find the Web");
}
}
catch (Exception ex)
{
throw (ex);
}
}
}
}


FILE#3: Entities (ListInfo.cs) (This file is used for creating properties)

using System;
using System.Data;
using System.Configuration;
using System.Linq;
using System.Web;
using System.Web.Security;
using System.Web.UI;
using System.Web.UI.HtmlControls;
using System.Web.UI.WebControls;
using System.Web.UI.WebControls.WebParts;
using System.Xml.Linq;
using Microsoft.SharePoint;
using System.Collections.Generic;

namespace WebPart
{
public class ListInfo
{
public string ListItemName { get; set; }
public string Description { get; set; }
public string ListItemTitle { get; set; }

public ListInfo ()
{
}

public ListInfo (string ListItemName, string Description, string ListItemTitle)
{
this.ListItemName = ListItemName;
this.Description = Description;
this.ListItemTitle = ListItemTitle;
}
}

public class ListItemsInfo
{
public ListItemsInfo()
{
ListItems = new List<>();
}
public List
ListItems
{
get;
set;
}
}
}